


The Complete Process of Professional Paver Cleaning and Sealing
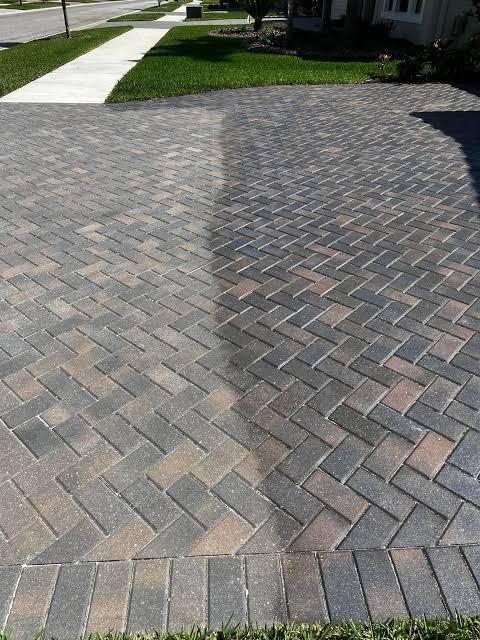
Outdoor pavers are commonly used for driveways, patios, pool decks, walkways, and other landscaped areas. Over time, exposure to sunlight, rain, humidity, dirt, algae, and regular foot traffic can affect their appearance and condition. Proper maintenance helps preserve the surface and reduce premature deterioration.
How do professionals clean and seal pavers? The process involves several stages, including inspecting the surface, removing contaminants, restoring joint sand, allowing sufficient drying time, and applying a suitable protective sealer. Each step contributes to achieving a consistent finish and maintaining the condition of the paving materials.
1. Inspect the Paver Surface
The first step involves examining the entire paved area to identify existing problems and determine the appropriate cleaning method.
Professionals generally check for:
- Dirt, algae, and mildew buildup.
- Oil, grease, and rust stains.
- White mineral deposits known as efflorescence.
- Cracked, chipped, or damaged pavers.
- Missing or deteriorated joint sand.
- Existing sealers or previous surface treatments.
The inspection also helps identify the paving material. Concrete, brick, clay, and natural stone may require different cleaning solutions and application techniques.
2. Remove Loose Dirt and Debris
Before washing begins, loose debris should be removed from the surface. Leaves, dust, grass, and accumulated soil can interfere with the cleaning process.
A broom, blower, or suitable cleaning equipment can remove loose materials from the pavers and joints.
This preparation makes it easier to identify stubborn stains and ensures that cleaning equipment can reach the affected areas effectively.
3. Pressure Wash the Pavers
Pressure washing is an important part of the cleaning process. It helps remove embedded dirt, algae, mildew, and other contaminants that ordinary sweeping cannot eliminate.
The water pressure and equipment settings must be adjusted according to the paver material and surface condition.
Excessive pressure can damage delicate surfaces, remove too much joint sand, or disturb the underlying bedding material.
For this reason, cleaning techniques should be selected carefully to balance effective contaminant removal with surface protection.
4. Treat Stubborn Stains and Efflorescence
Some contaminants require additional treatment beyond ordinary pressure washing.
Oil and grease stains may need appropriate degreasing solutions, while rust deposits require products specifically formulated for rust removal.
Efflorescence appears as a white, powdery deposit caused by soluble salts moving through masonry materials and accumulating on the surface.
These deposits should be treated with suitable cleaning methods before sealing. Applying a protective coating over untreated mineral deposits can affect the final appearance.
Cleaning products must always be compatible with the paving material to prevent discoloration or surface damage.
5. Replenish the Joint Sand
Joint sand fills the spaces between individual pavers and helps maintain their alignment and stability.
Pressure washing can remove or displace existing sand, particularly when the joints are already deteriorated.
After cleaning, the joints should be inspected and replenished where necessary.
Polymeric sand is another option for suitable paving installations. It contains binding additives that harden after proper activation with water.
Its installation requires appropriate joint preparation, correct application, and sufficient curing time according to product specifications.
Properly maintained joints help limit paver movement and reduce the accumulation of debris.
6. Allow the Pavers to Dry Completely
Drying is one of the most important stages before sealer application.
Water can remain trapped inside porous pavers and beneath joint sand even when the surface appears dry. Applying a coating before the moisture level is suitable can cause whitening, haziness, poor adhesion, and uneven finishes.
Drying time depends on several factors:
- Paver material and porosity.
- Temperature and sunlight exposure.
- Humidity levels.
- Rainfall and drainage conditions.
- Joint depth and moisture retention.
Depending on the conditions, drying may require 24–48 hours or longer. The actual moisture requirements of the selected sealer should always be followed.
7. Select the Appropriate Paver Sealer
Different sealers provide different protective characteristics and finishes. Product selection depends on the paving material, environmental exposure, and desired appearance.
Water-based sealers: These products generally have lower odor and are available in natural, satin, and color-enhancing finishes.
Solvent-based sealers: These formulations can provide richer colors and wet-look appearances, depending on the product.
Penetrating sealers: These treatments enter the pores of the material and are often selected when maintaining a natural appearance is important.
For pool decks and other wet walking areas, slip resistance should be considered when selecting a finish.
8. Apply the Sealer Properly
Once the surface meets the required moisture conditions, the selected sealer can be applied according to its technical specifications.
Application methods may include spraying, rolling, or other suitable techniques, depending on the product and surface.
Important considerations include:
- Applying the recommended amount.
- Maintaining even coverage.
- Avoiding excessive product buildup.
- Following temperature and humidity requirements.
- Allowing sufficient curing time.
- Protecting the area from premature rainfall and foot traffic.
Incorrect application can result in sticky surfaces, uneven gloss, whitening, or premature coating failure.
9. Maintain the Sealed Pavers
Regular maintenance helps preserve the appearance and performance of treated paving surfaces.
Routine sweeping removes dirt and organic debris, while occasional washing helps prevent algae and mildew accumulation.
Oil spills and other stains should be addressed promptly using compatible cleaning products. Periodic inspections can also identify deteriorating joint sand, damaged pavers, and areas where the protective coating may need attention.
The appropriate maintenance schedule depends on traffic, weather exposure, paving material, and sealer specifications.
Conclusion
Professional paver cleaning and sealing involve more than pressure washing and applying a protective coating. Surface inspection, debris removal, stain treatment, joint sand replacement, proper drying, and careful sealer application all contribute to the overall result.
Each stage serves a specific purpose in maintaining outdoor paving surfaces. Understanding the process helps explain how proper preparation and suitable materials can improve appearance, reduce staining, and support the long-term condition of driveways, patios, walkways, and pool decks.

 English
 Arabic
 French
 Spanish
 Portuguese
 Deutsch
 Dutch
 Italiano
 Russian
 Romaian
 Portuguese (Brazil)
 Greek